HTPC Hardware

HDPLEX Passive NUC Kit supports 10th Gen NUC now!

HDPLEX Passive NUC kit now officially supports Intel 10th Gen NUC boards:
NUC10i7FNK/FNH
NUC10i5FNK/FNH
NUC10i5FNK/FNH

These boards are using 35*35mm heatsink mounting pattern. HDPLEX fanless NUC heatsink copper base supports this mounting pattern for both 8th and 10th Gen NUC boards.

HDPLEX NUC Kit current I/O plate supports Intel 10th Gen NUC back I/O which is one HDMI+one USB Type C 3.1.


For details please visit HDPLEX Passive NUC Kit product page.

HTPC Hardware

HDPLEX Release Passive NUC Kit for H1 series Fanless PC Case

HDPLEX passive NUC Kit is designed for H1 Series fanless PC case includes H1 V3 and H1.TODD.

The HDPLEX NUC Kit shares the same six-heatpipe solution as H1 CPU heatsink system. It uses both sides of the H1 fanless PC case to dissipate heat and supports 65W TDP.

HDPLEX passive NUC kit is the best NUC fanless cooling solution on the market and it provides significantly better thermal performance than low cost single aluminum plate direct contact solution.

HDPLEX passive NUC Kit supports two heatsink mounting pattern: Three Point Triangle Mounting which is used by 7th Gen or older NUC and Four Point Square Mounting (35*35mm) which is used by 8th and 10th Gen NUC.

HDPLEX Passive NUC Kit supports 7th/8th/10th Gen NUC Heatsink Mounting Pattern

HDPLEX passive NUC Kit comes with two I/O shield plate. One supports HDMI plus single USB Type C 3.1 port layout and the other supports dual HDMI layout. The I/O shield plate has two additional USB port and one 5.5/2.5mm DC jack port to route HDPLEX internal power supply DC output to the backplate.

HDPLEX NUC kit currently supports the following NUC board. Thanks to its modular design, HDPLEX NUC kit will be able to support future NUC by adding new I/O plate.

NUC10i7FNK/FNH
NUC10i5FNK/FNH
NUC10i5FNK/FNH NUC8i7BEB
NUC8i5BEB
NUC8i3BEB
NUC7i7DNBE
NUC7i5DNBE
NUC7i3DNBE
NUC7i7BNB
NUC7i5BNB
NUC7i3BNB

HDPLEX H1 Fanless PC case equipped with HDPLEX Passive NUC kit is the first NUC case on the market to support PCIE expansion card by using M.2 to PCIE riser.

HDPLEX NUC Case supporting JCAT USB Card
HDPLEX NUC Case supporting JCAT Femto USB Card with NUC8i3BEB
HDPLEX Fanless NUC Case is the first NUC case to support PCIE card for NUC motherboard

M.2 slot will be occupied by the M.2 to PCIE riser, SATA SSD is required in this configuration.

HDPLEX H1 series with HDPLEX passive NUC kit is also the first NUC case on the market to support internal power supply. You can have a fully internal power supply solution and does not need an external AC adapter if you use HDPLEX internal 80W or 200W AC-DC adapter with 19VDC output.

HDPLEX Passive NUC Case is the first NUC case to support fully internal power supply

HDPLEX Passive NUC Kit installation guide could be downloaded here.

HDPLEX Fanless Silent PC Review

Lars Roon Bridge/Server Build using HDPLEX H5 case from Audio Science Review Forum

Original review Lars Roon Bridge/Server Build using HDPLEX H5 Fanless PC case

HDPLEX Fanless Silent PC Review

HTPC build log with HDPLEX H5 MK2 from AVS Forum

Detail build log and review could be located here at avsforum.com

Before I start, here is a list of components I want to put in, as well as an outline of the issues around this build:

Design goal:
– silent PC
– low power (will be ON 24/7)
– using existing components as much as possible

Existing components list:
CPU: Intel Core i5 4570T (35W TDP)
MB: Gigabyte GA-Z97MX Gaming 5
RAM: 16GB Corsair Vengeance LP (CML8GX3M2A1600C9)
SSD: 128GB Samsung 840EVO
HDD: 2 x WD RED 3GB (WD30EFRX)
WiFi card: Asus PCE-AC68
SoundCard: SoundBlaster ZxR
Video Card: Gigabyte GV-N730D5-2GI (rev 2)

New components:
HDPLEX H5 rev 2 case
160W AC-DC module
250W HiFi DC-ATX module
2 x HDPLEX GPU cooler
2 x HDPLEX PCI-X 3.0 X16 riser

In closing I would like to summarize my impressions of this build:

1. The case quality is top notch; all tolerances are so that I never had a problem to elegantly fit all screws/hinges/corners.
2. The case is a bit crammed (especially when you put all the stuff I put inside); Here I say again @HDPLEX: please, please, please make the case just a bit bigger, so that nut cases like me can still make the build without so much frustration.
3. the PCI-X riser cable is very strange.
– It is too tall on the MB side due to that PCB part that mates the Female connector on the MB to the female connector on the ribbon. If you try to fit it in a second/third/fourth PCI-X slot it will cause shorts to the bottom expansion card in the case
– it is bent strangely on the expansion card side, causing the user to have to make a 180 deg bend in the ribbon (lots of stress) to make it fit. The ribbon quality seems wobbly… no screening….
4. I am sure the build can be a quite pleasant 4-5 hours build if you make it standard; if you are like me and have some special non-standard ideas about what and how you want to put in, then it can be quite frustrating: lack of space (not for work but for crazy ideas), lack of PCI-X ribbons on the market (for crazy ideas), lots of trial and error and lots of learning as well

HDPLEX Fanless H5 PC case build log

HDPLEX Fanless H5 PC case build log

HDPLEX Fanless H5 PC case build log

HDPLEX Fanless H5 PC case build log

HDPLEX Fanless Silent PC Review

HDPLEX Fanless H1.S PC Build from Italy with eSATA port Added

H1.S Build link to user facebook page.

Nuovo PC, completamente “fanless” dedicato alla musica “liquida”. L’ho assemblato a partire dal HDPLEX H1.S (http://hdplex.com/), uno chassis in alluminio massiccio che utilizza un sistema di dissipazione passivo a heatpipe. Si tratta di sei piccoli tubi di rame – al cui interno si trova una piccola quantità di liquido – che hanno la funzione di trasferire il calore prodotto dal processore al telaio metallico, che funge così da ulteriore superficie dissipante.
Ho utilizzato appositamente un nuovo processore Intel della famiglia Skylake-S, appartenente alla linea T a basso consumo (quindi con una ridotta necessità di dissipare il calore).
L’H1.S dispone unicamente di due porte USB 3.0 supplementari, accessibili frontalmente (in realtà si trovano sul pannello laterale destro), Ho preferito perciò operare una leggera modifica, ricavando un’apertura sul pannello laterale sinistro per ospitare una porta e-sata.

H1.S Fanless PC Build from Italy with eSATA port added.

H1.S Fanless PC Build from Italy with eSATA port added.

H1.S Fanless PC Build from Italy with eSATA port added.

H1.S Fanless PC Build from Italy with eSATA port added.

H1.S Fanless PC Build from Italy with eSATA port added.

H1.S Fanless PC Build from Italy with eSATA port added.

H1.S Fanless PC Build from Italy with eSATA port added.

HDPLEX Fanless Silent PC Review HTPC Hardware

HDPLEX 2nd Gen H5 Fanless PC Going Vertical by DekaModder

Original Mod by the famous Dekamodder from SPAIN

Lots of detail build pictures!

HDPLEX 2nd Gen H5 fanless PC going vertical by DekaModder

HDPLEX 2nd Gen H5 fanless PC going vertical by DekaModder

HDPLEX 2nd Gen H5 fanless PC going vertical by DekaModder

HDPLEX 2nd Gen H5 fanless PC going vertical by DekaModder

HDPLEX 2nd Gen H5 fanless PC going vertical by DekaModder

HDPLEX 2nd Gen H5 fanless PC going vertical by DekaModder

HDPLEX 2nd Gen H5 fanless PC going vertical by DekaModder

HDPLEX 2nd Gen H5 fanless PC going vertical by DekaModder

HDPLEX 2nd Gen H5 fanless PC going vertical by DekaModder

HDPLEX 2nd Gen H5 fanless PC going vertical by DekaModder

HDPLEX 2nd Gen H5 fanless PC going vertical by DekaModder

Montaje del Hardware

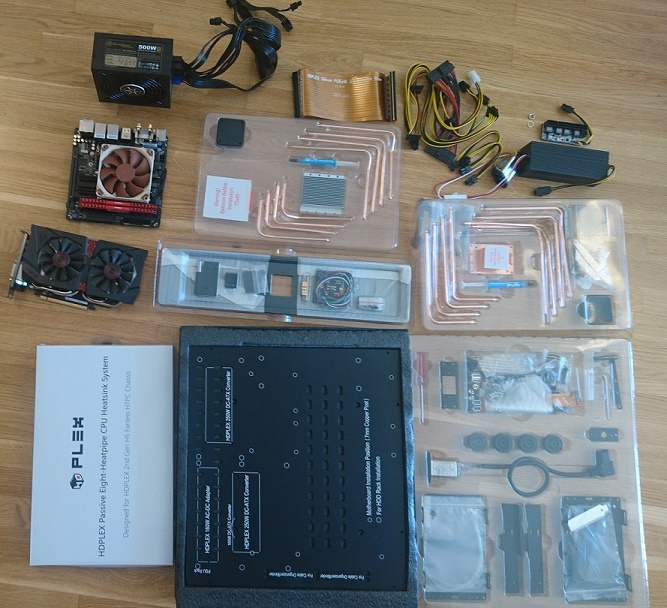
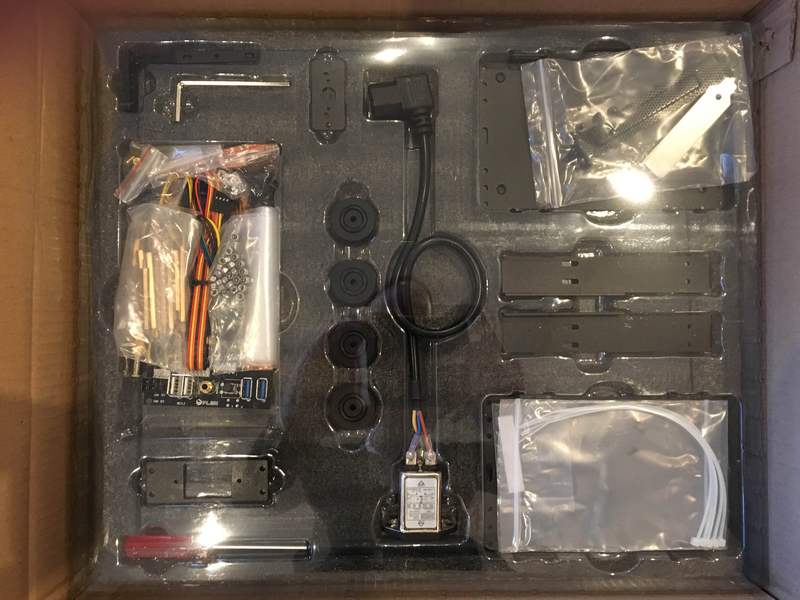
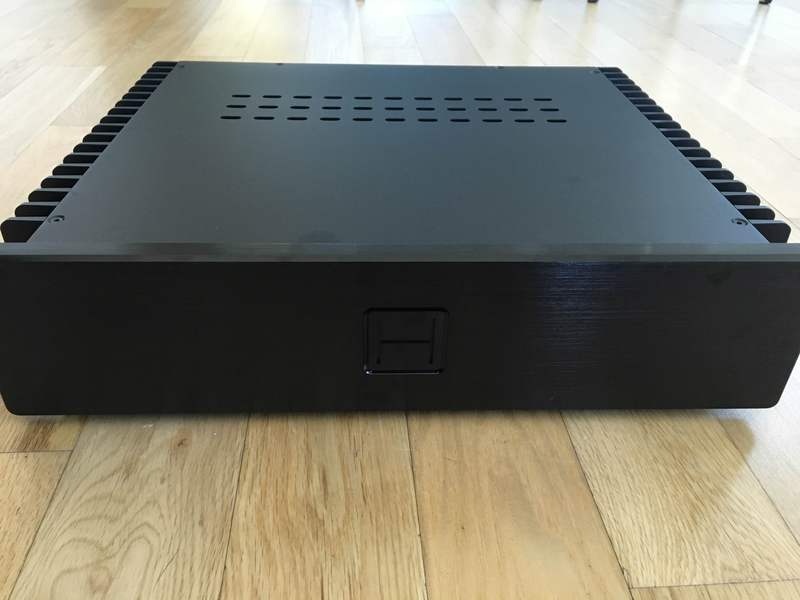
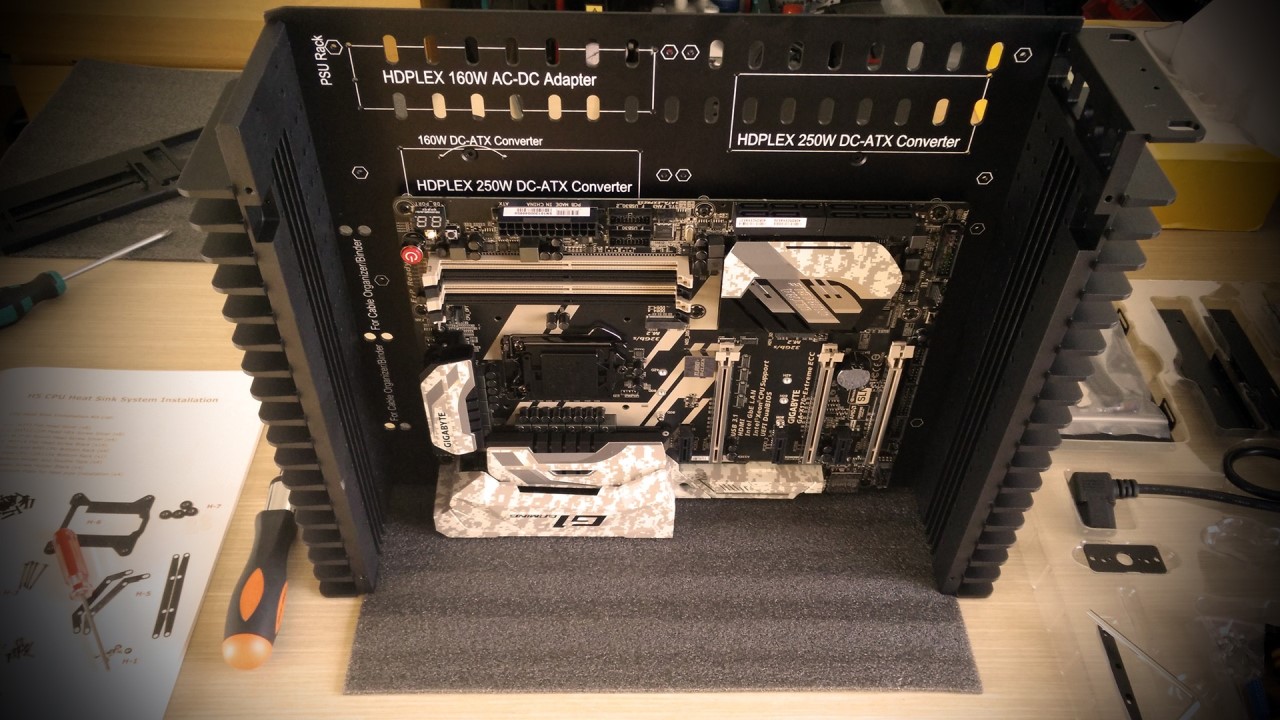
IMG_20160510_144932La HDPLEX H5 es como poco tediosa de montar, viene completamente desarmada y te sientes como montando un mueble de Ikea. Cierto es que fue delicioso el ver cada pieza perfectamente empaquetada y expuesta cuando abrí la caja, pero hay que tener en cuenta que no es un chasis como los demás que lo abres y montas el hardware directamente, aquí hay un trabajo fino que realizar previamente de ensamblaje. Si tenemos en cuenta su formato reducido para ser un ATX y que viene todo desmontado, evidentemente dependiendo de lo que montemos dentro tendremos que escoger nuestras piezas del chasis y descartar otras… que no parezca esto una característica negativa del chasis si no mas bien todo lo contrario, ya que viene preparado para la gran mayoría de componentes del mercado y el abanico de posibilidades de montaje es enorme, está muy bien pensado este HDPLEX H5, pero no puedo evitar concienciar a quien quiera montar uno de estos chasis sobre su complejidad, tardé mucho tiempo en cuadrar todo el chasis para el setup que tenía y montarlo, sin mencionar que el anclaje de la fuente de alimentación se tuvo que adaptar. Pero como dice un amigo, si fuera fácil no sería divertido.

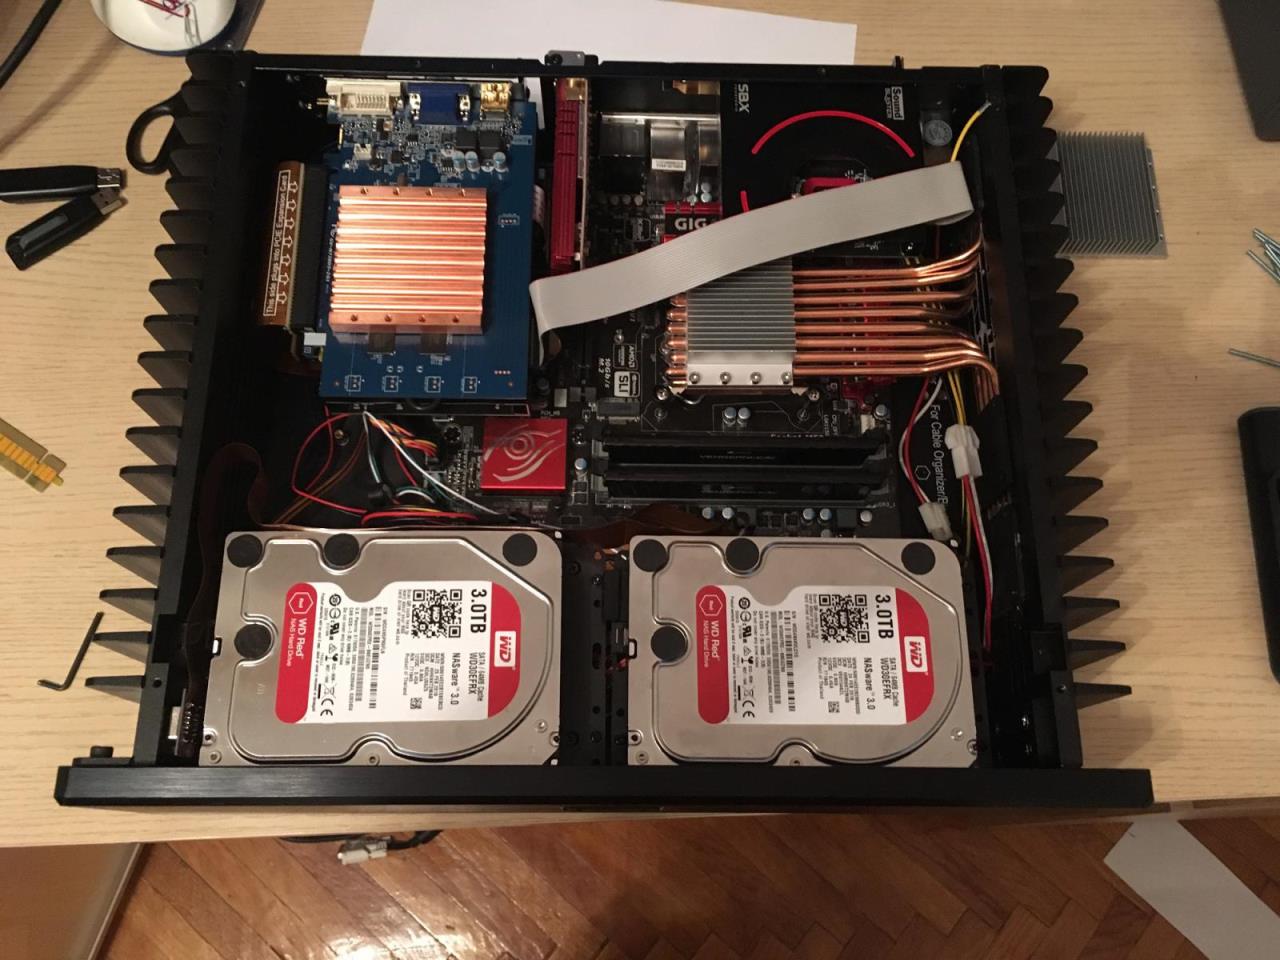
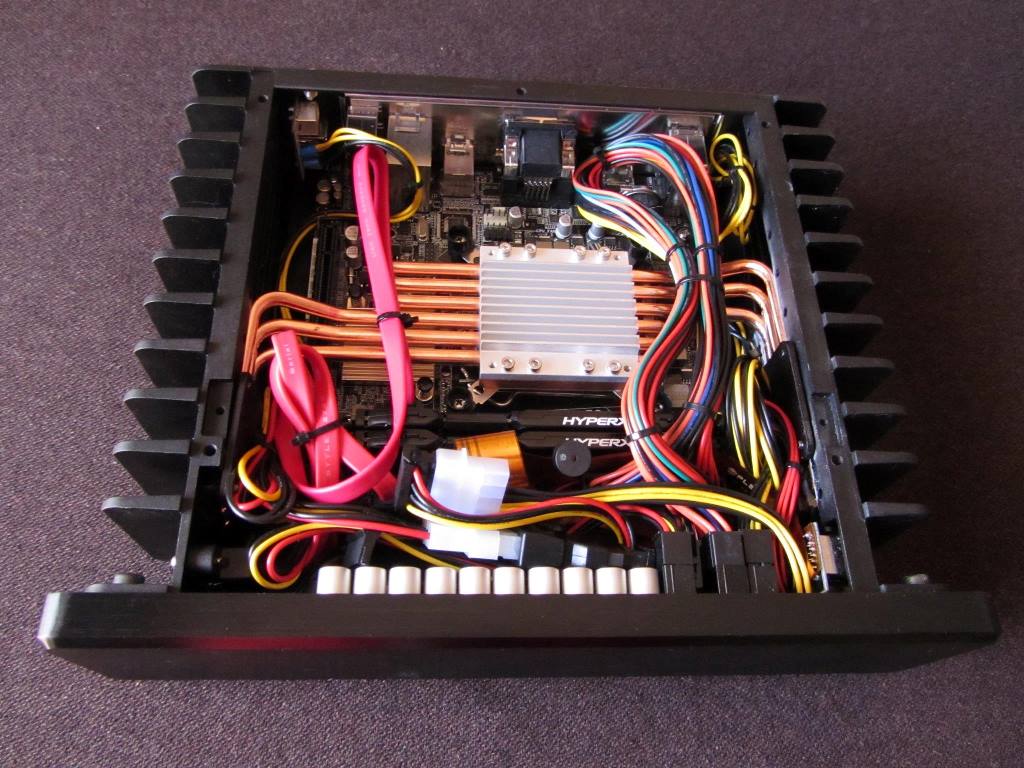
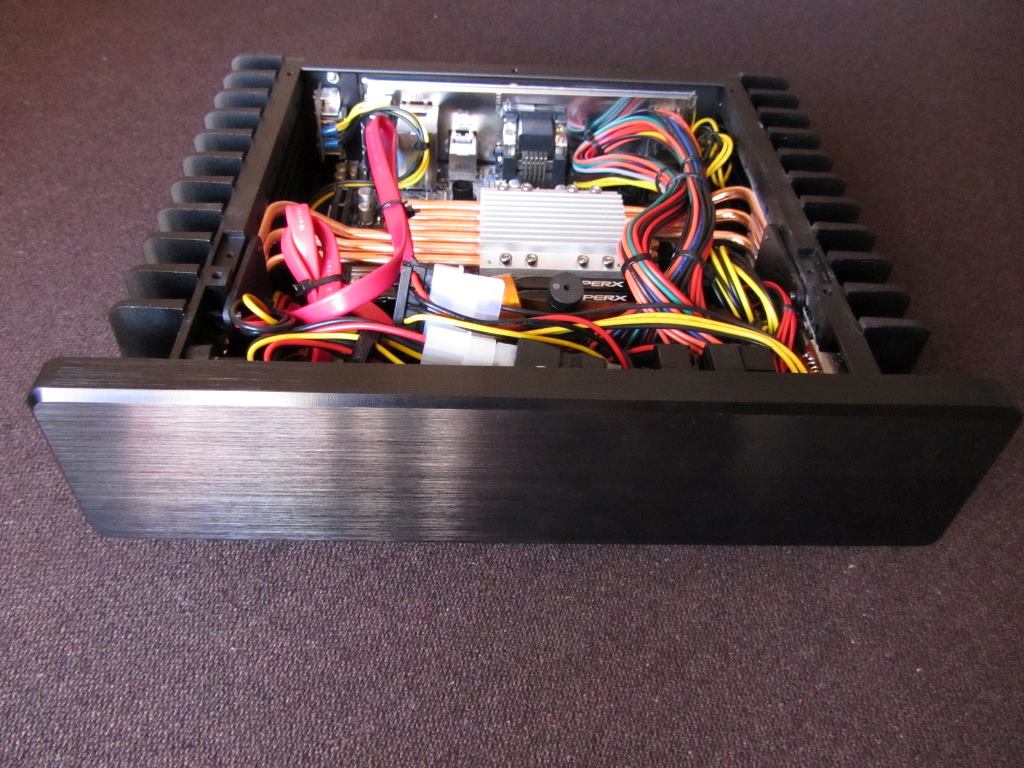
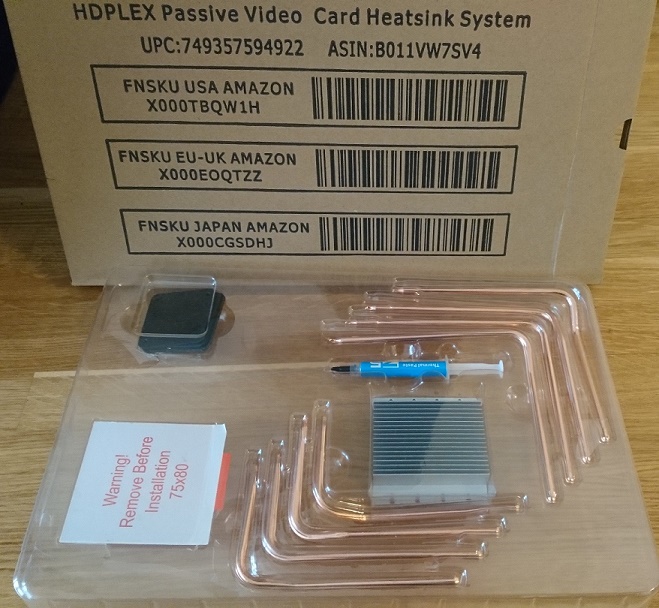
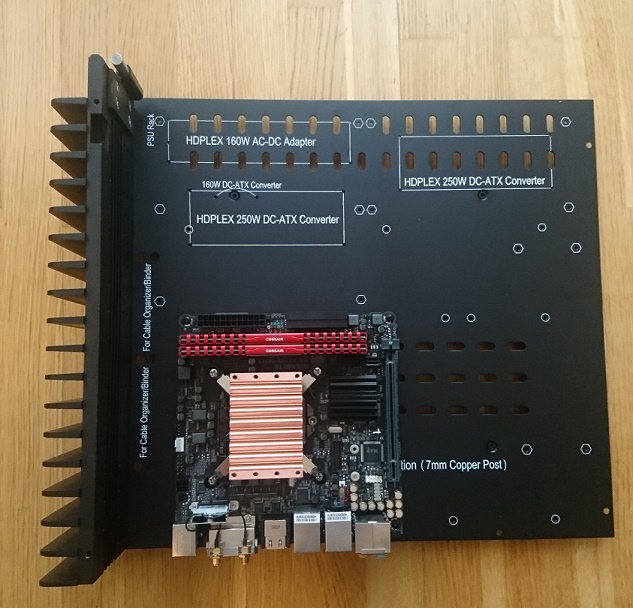
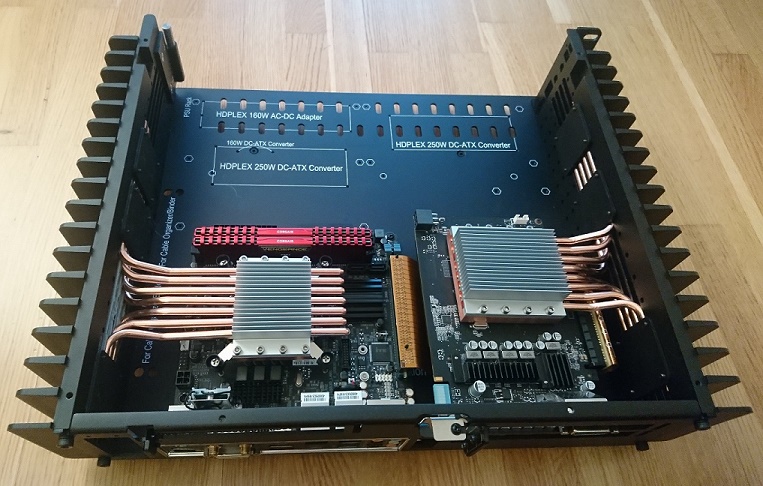
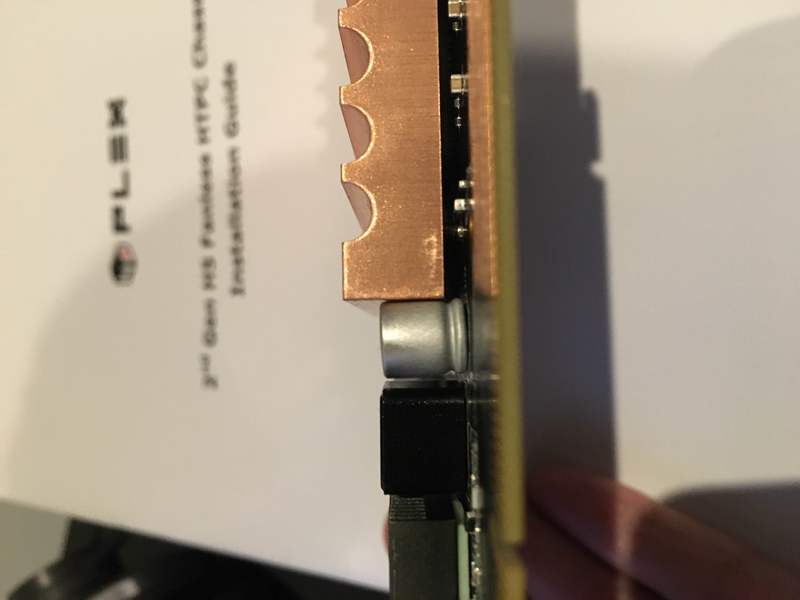
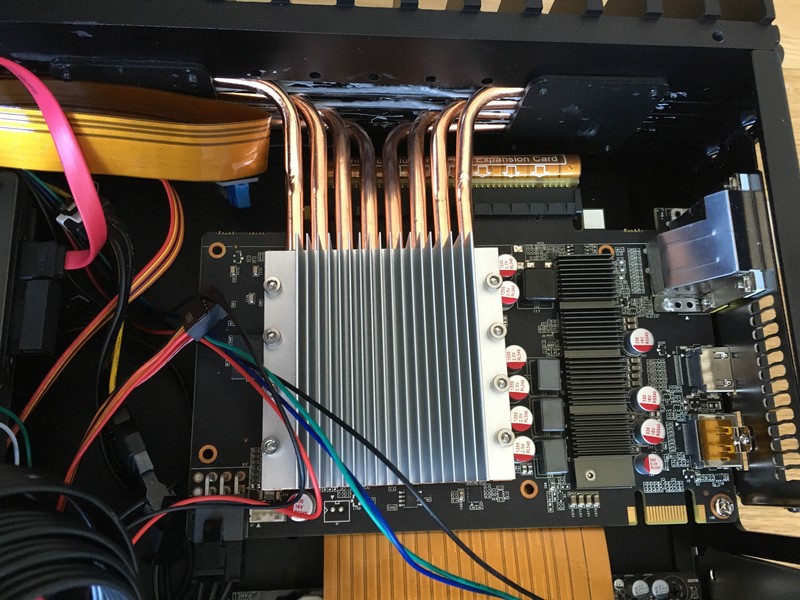
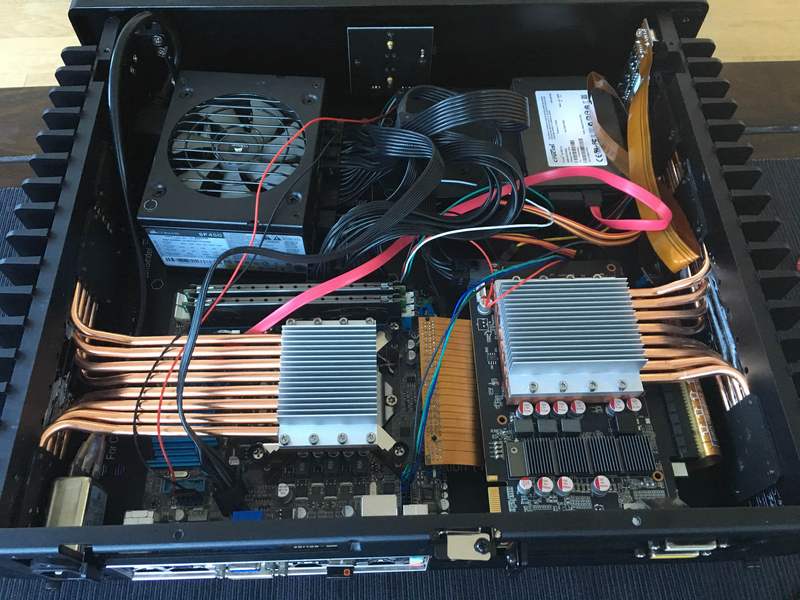
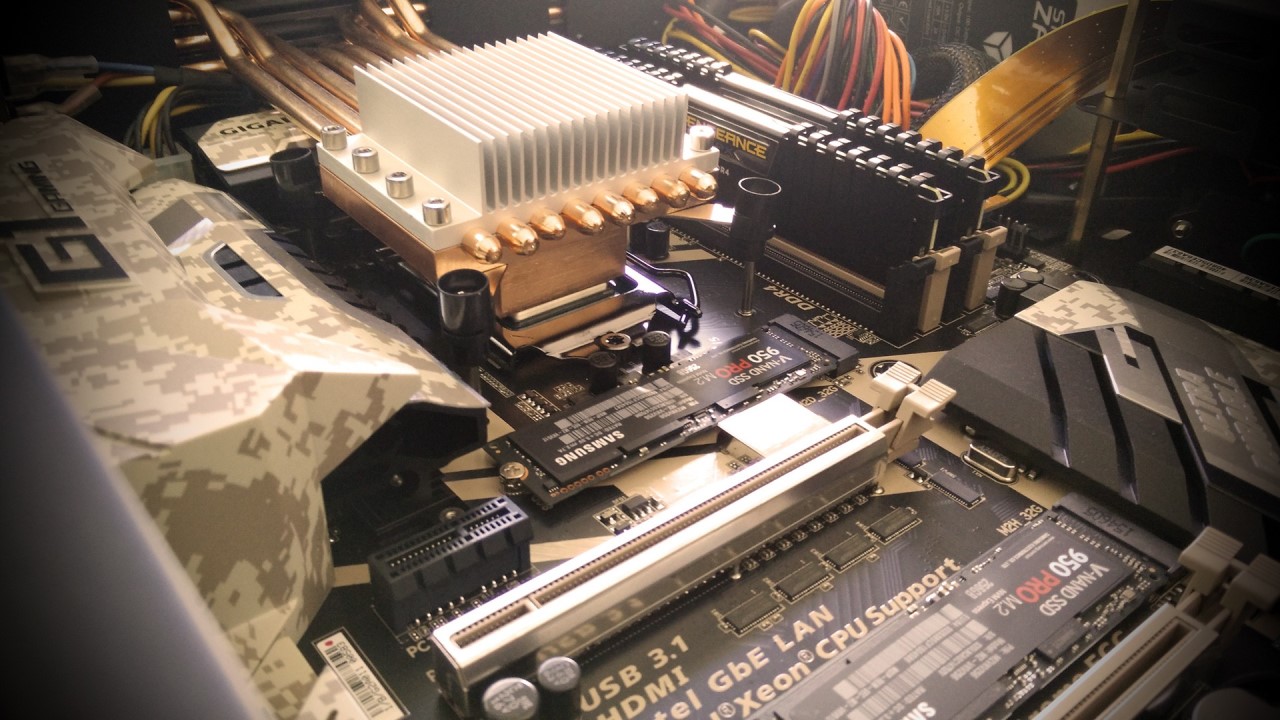
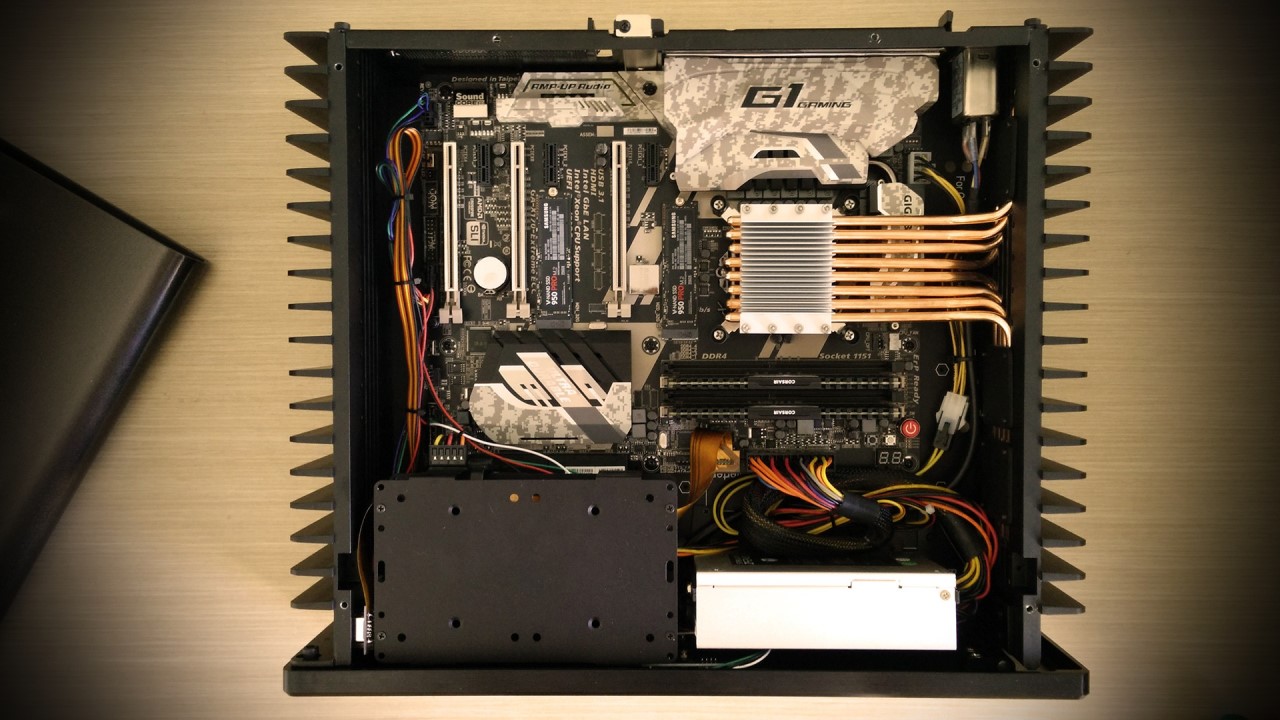
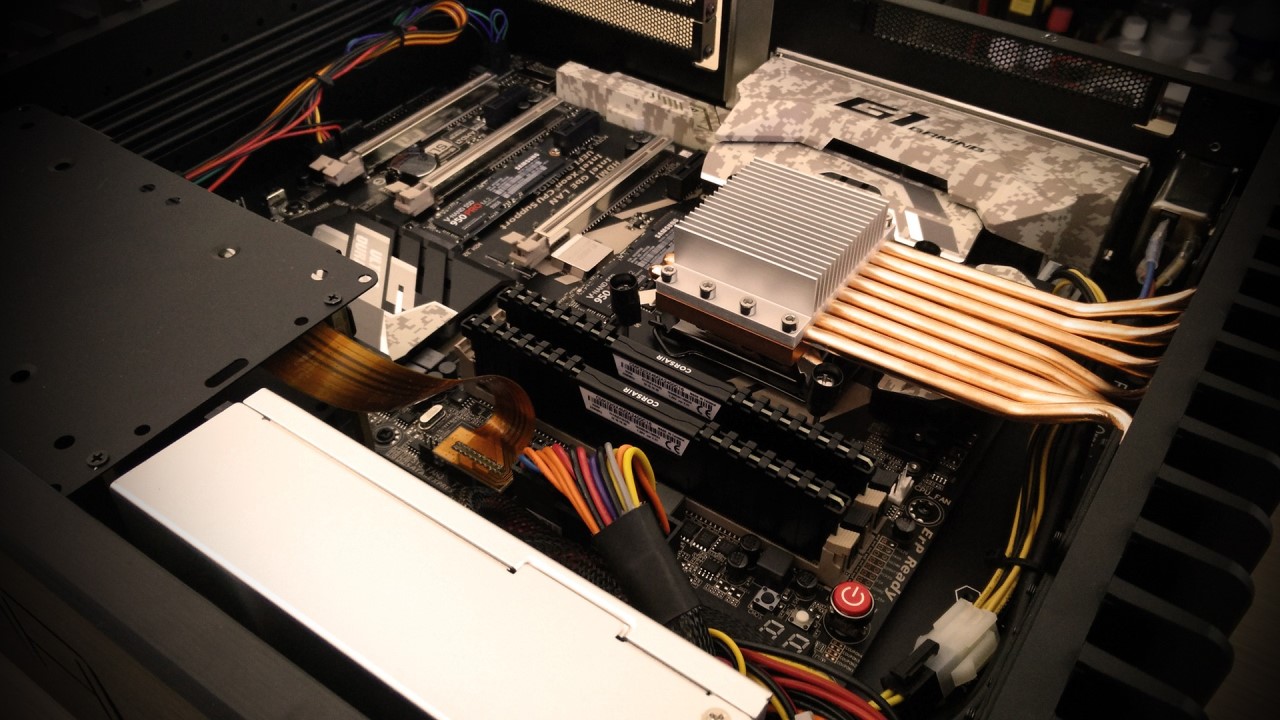
IMG_20160524_194227IMG_20160524_194838Al montar la placa base en el chasis y colocar el procesador, se monta un disipador pasivo y se ancla a la placa base, luego se colocan una serie de 8 heatpipes de cobre que nacen en el disipador del CPU previamente instalado y se anclan en una serie de canales que tiene, por dentro, el lateral del chasis. Ya que el chasis es de aluminio, ayudará enormemente en la disipación del calor generado por nuestro procesador. Este chasis viene preparado con unos canales idénticos en la cara opuesta, y con el accesorio adecuado podríamos disipar de esta forma también, una tarjeta gráfica. Estos 8 heatpipes requieren de pasta térmica por ambos extremos, lógicamenteIMG_20160525_110035; siempre que tengamos dos piezas independientes en contacto y nuestra intención sea la transferencia de calor entre ambas, la pasta térmica actúa como elemento de encaje para conseguir la mayor superficie de contacto posible, y con ello, la mayor transferencia de calor. Esta labor se realiza con una herramienta especial que encaja perfectamente en los canales del chasis y requiere de paciencia y delicadeza, ya que lleva su tiempo y es importante colocar la cantidad mínima de componente posible para una eficiencia óptima.

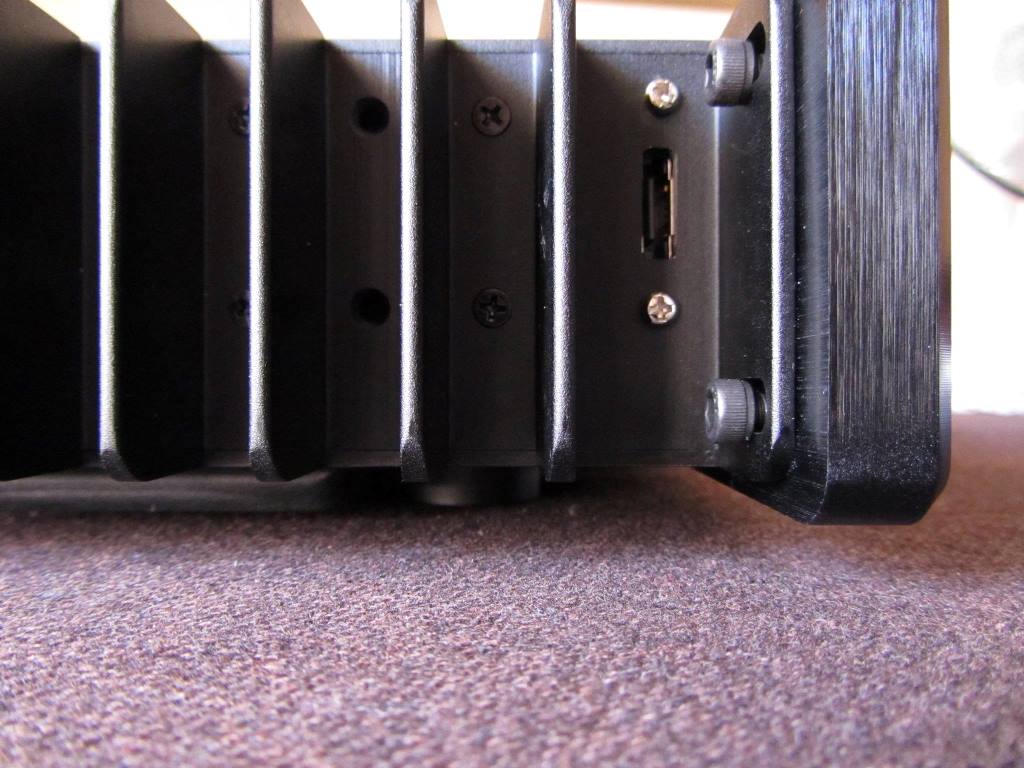
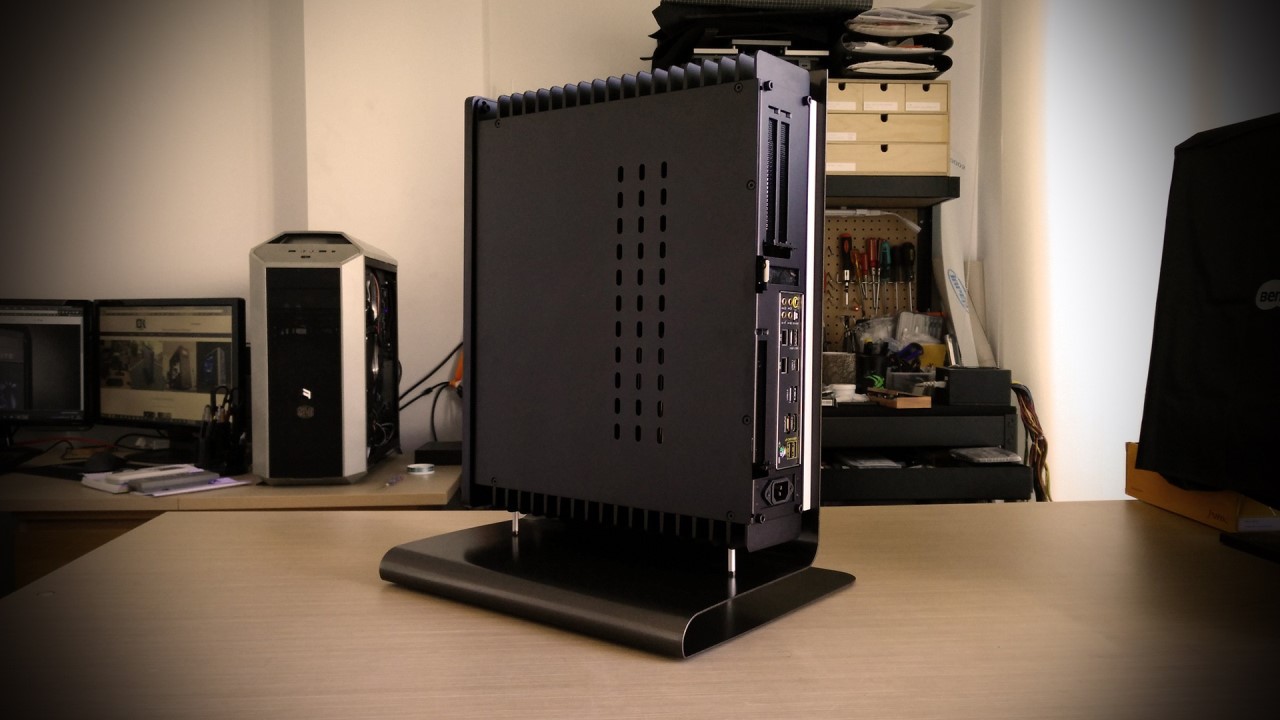
IMG_20160525_154113El frontal del chasis trae un botón con iluminación desmontado muy bonito, requiere de alimentación que se le suministra desde un puerto interno USB de la placa base y trae los dos cables básicos de power y hdled.

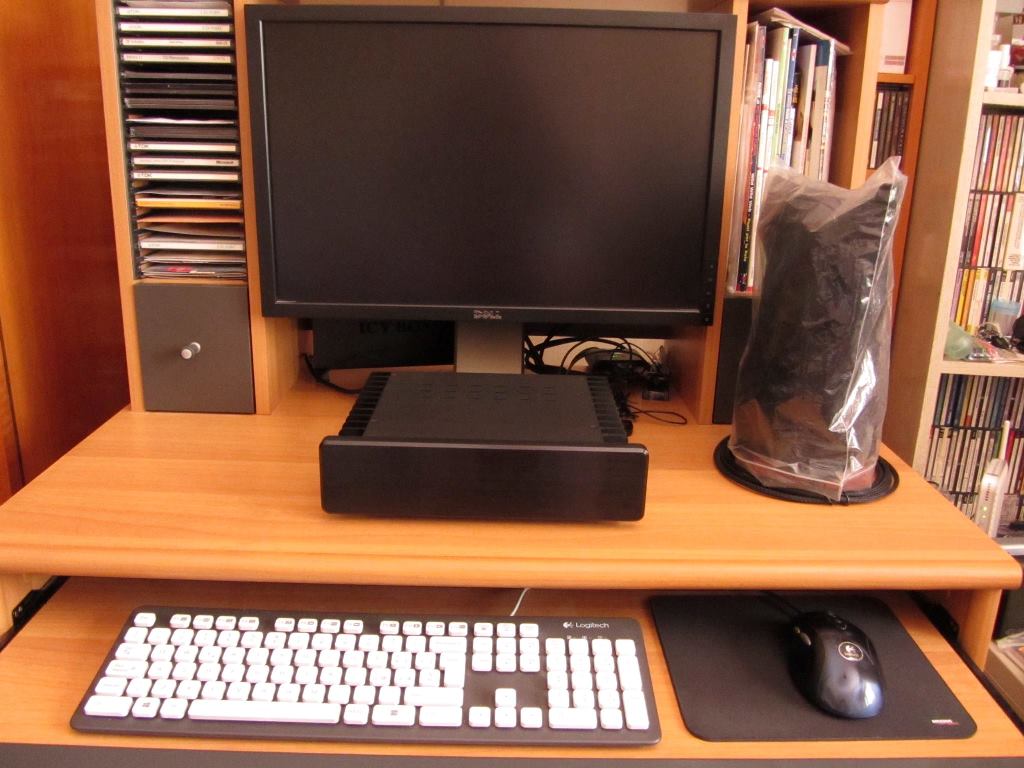
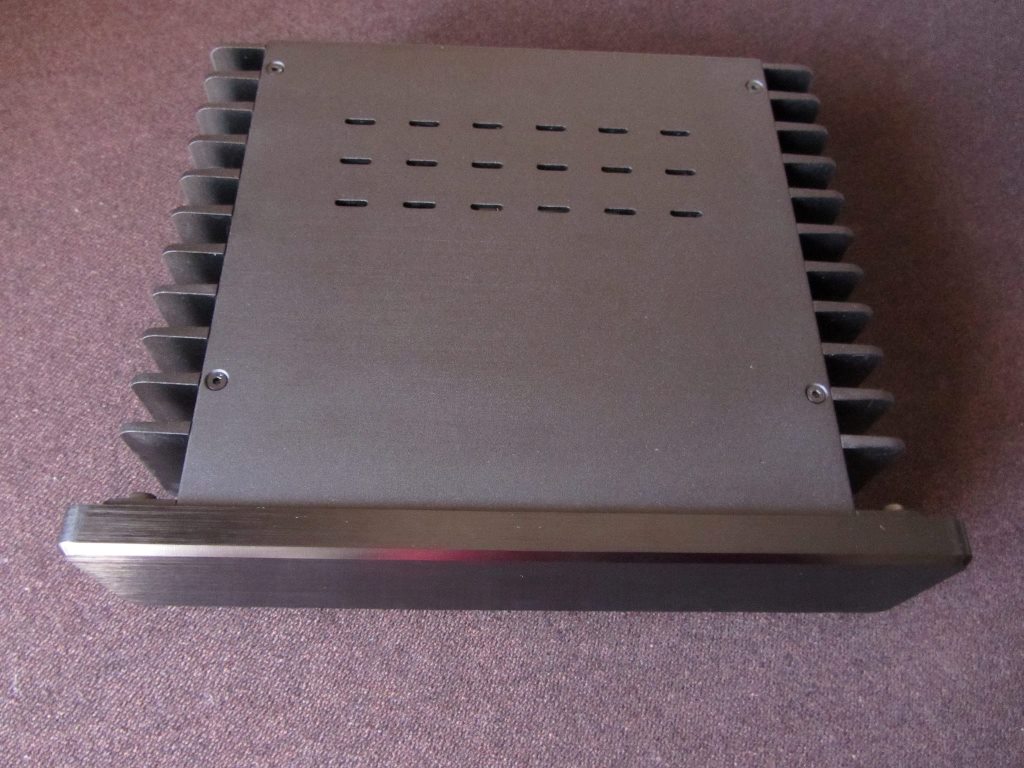
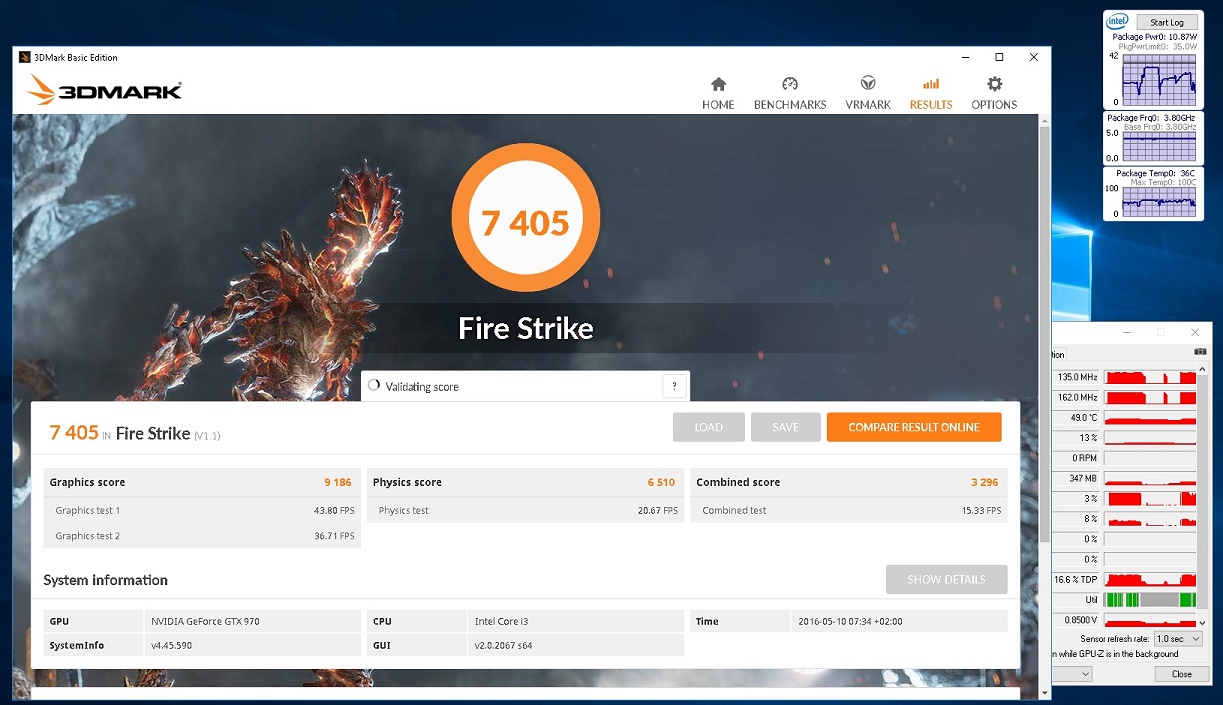
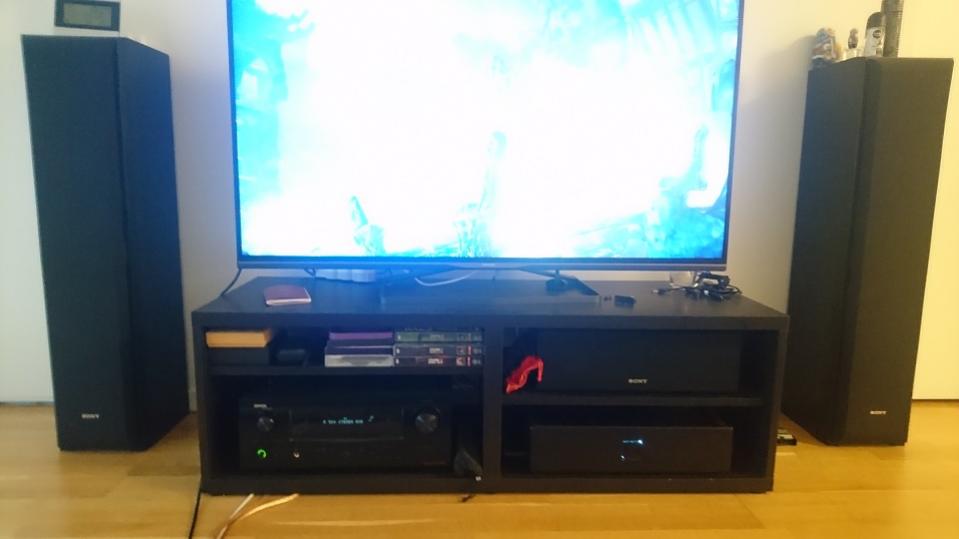
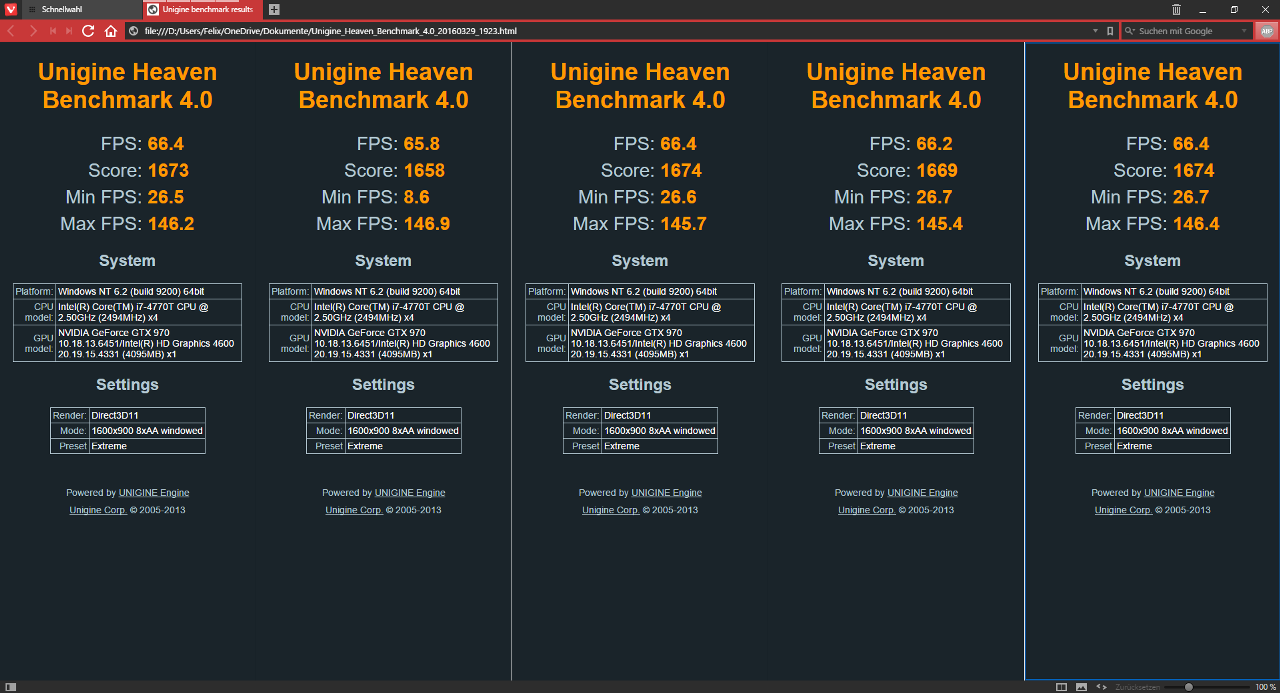
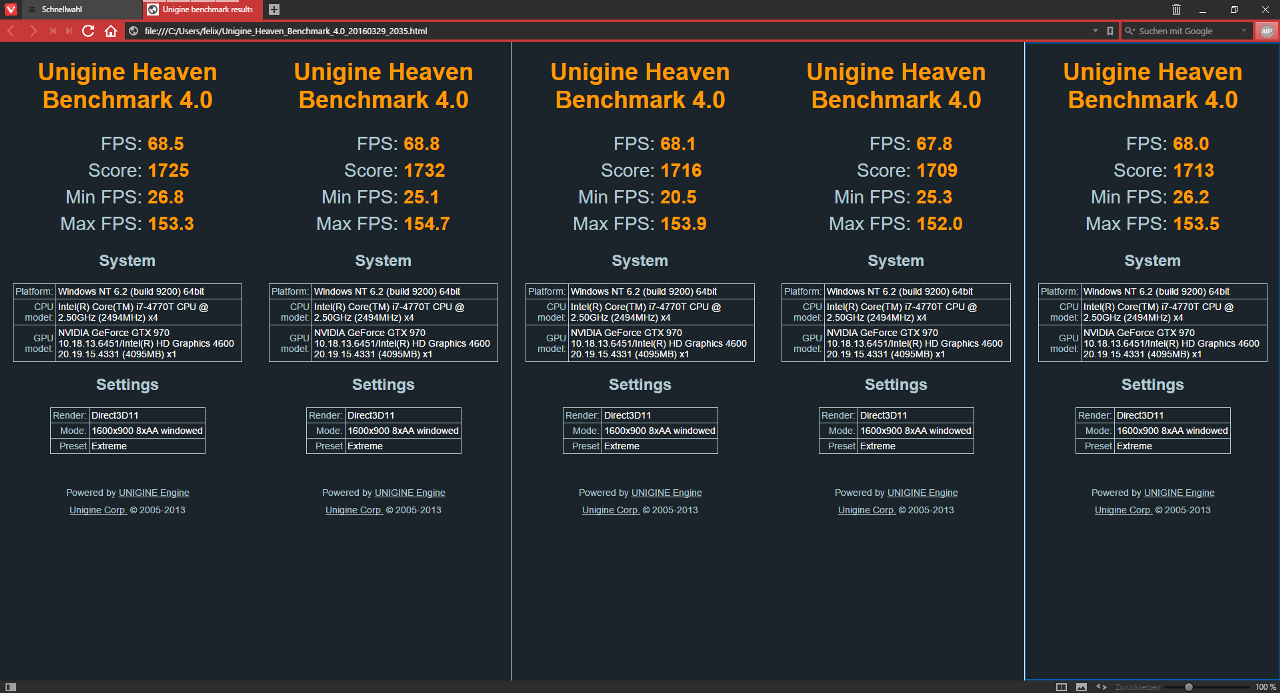
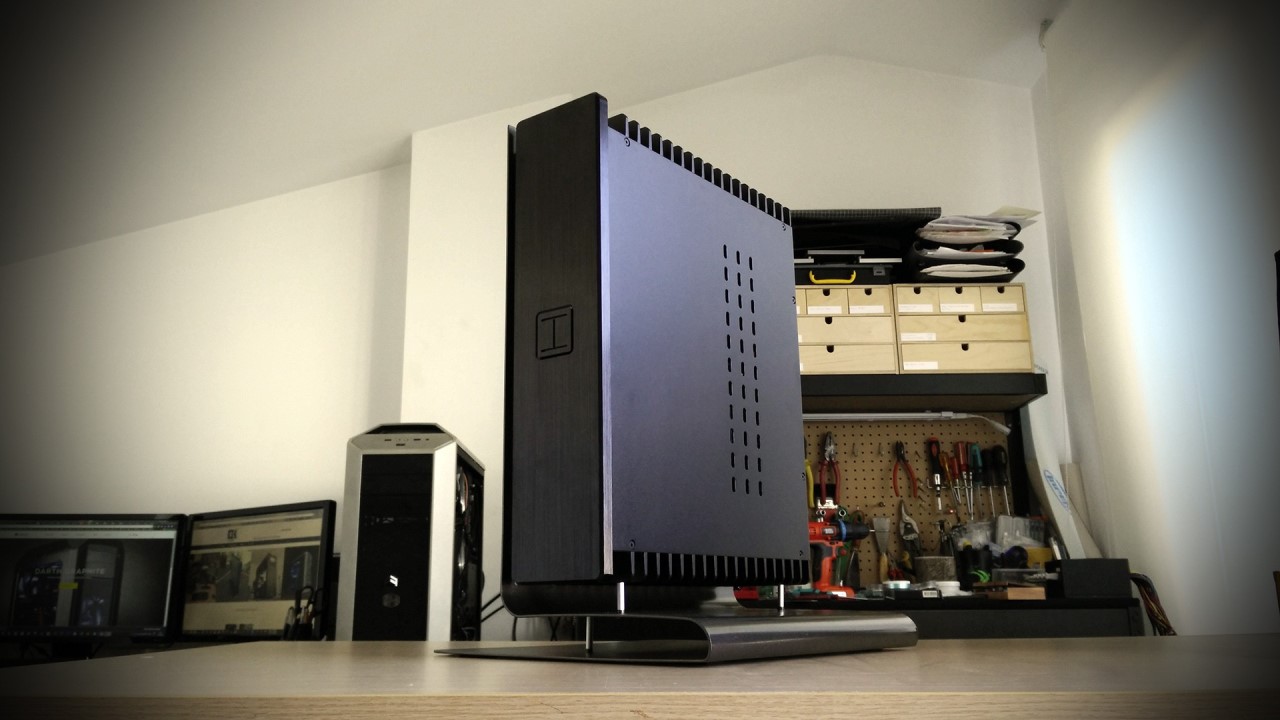
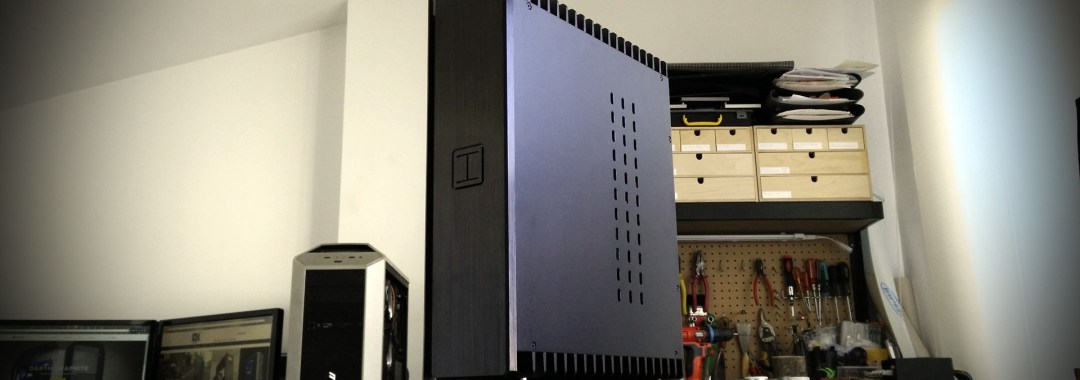
HDPLEX H5 Ptwo casemod by DeKaEl chasis una vez montado es un espectáculo, y mas aún cuando lo enciendes y lo exiges al máximo y ves como se defiende. El Xeon en full estrés no superaba los 80ºC de temperatura (ambiente a 22º), recordar que estamos hablando de un disipador pasivo, no hay ventiladores enfriando el sistema, realmente muy interesante opción, solo por mencionar una pega a tener en cuenta, nuestro PC en verano será un mini radiador de calor… pero por otro lado en invierno lo agradeceremos ?

HDPLEX H5 Ptwo casemod by DeKaA los discos duros M.2 les añadí unos disipadores pasivos ademas, ya que habíamos leído que estos modelos subían un poco de temperatura, como el ambiente interior del chasis sería caliente, mejor prevenir que curar.

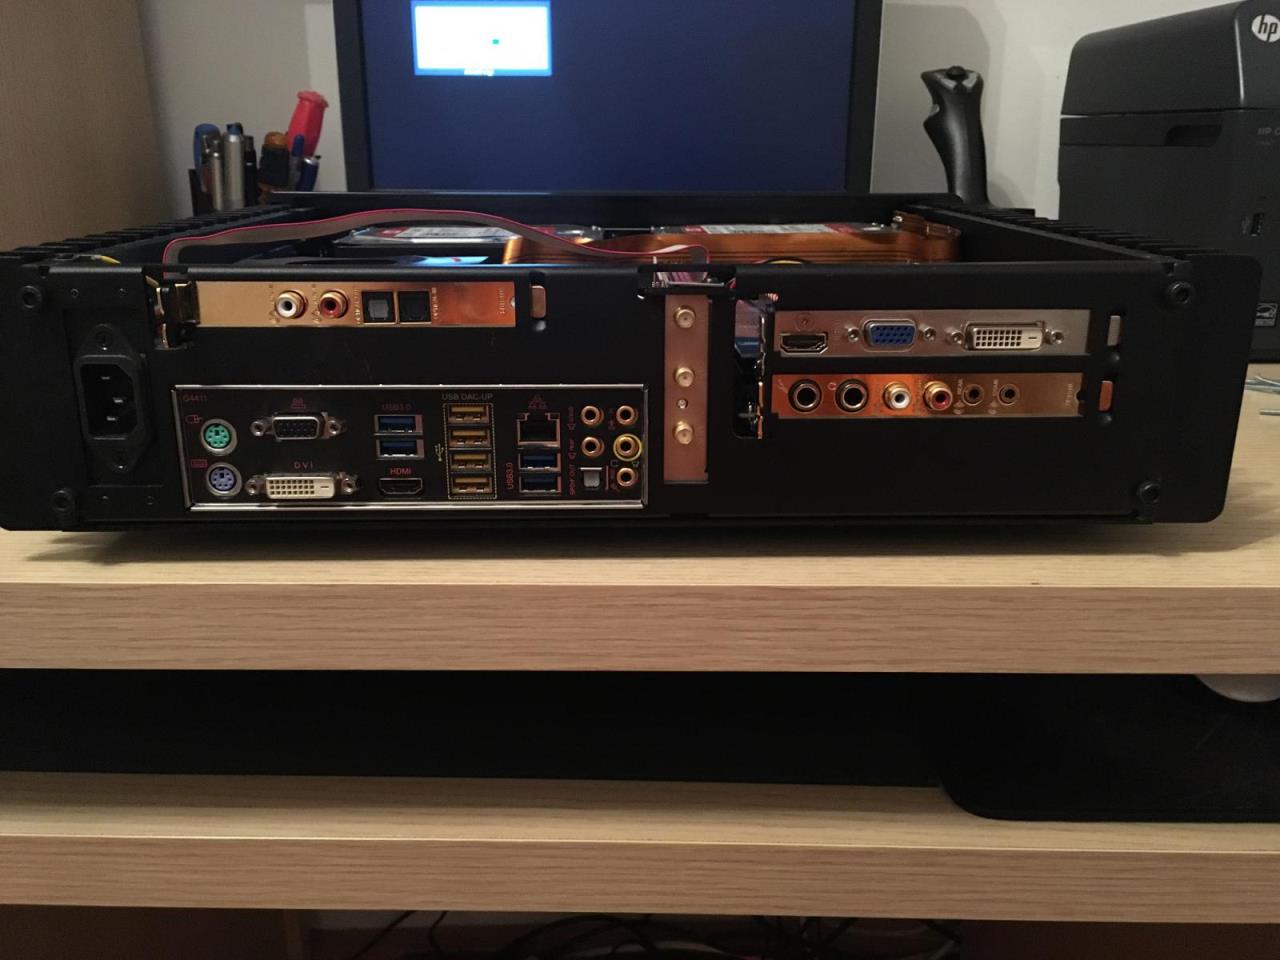
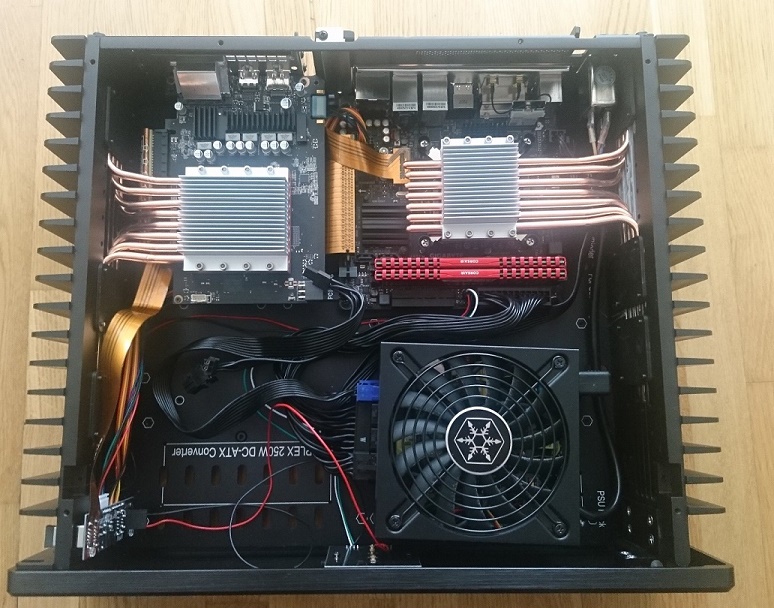
El resto de componentes como el SSD y memoria RAM no requieren de comentario alguno, pero si me gustaría comentar algo sobre la fuente de alimentación. Tened en cuenta que el chasis viene preparado para una gran variedad de fuentes de alimentación… Podemos colocar la PSU dentro del chasis y disponemos de una serie de anclajes para muchos formatos, entre ellos ATX, SFX y FlexATX, siempre hablando en la rama fanless, junto con un extensor interno para el cable de alimentación… pero también podemos utilizar una fuente de alimentación externa, contando con los accesorios necesarios para todos los formatos existentes de PSUs externas y eliminando calor interior que disipar, una opción interesante si no nos molesta el cacharro fuera y la potencia necesaria no es muy alta.

Modding, la peana

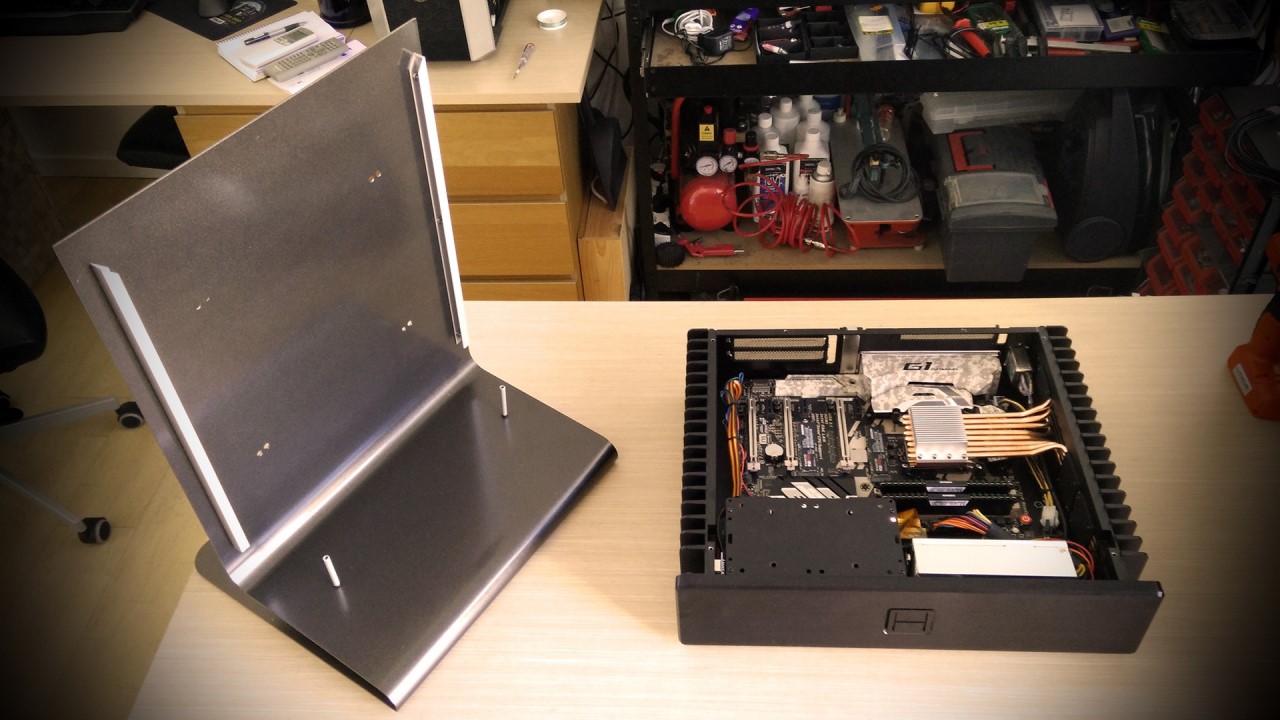
HDPLEX H5 Ptwo casemod by DeKaMi cliente vio el proyecto del HTPC lian-li mod de salón, le gustó y me pidió adaptarlo para este setup. No había mucho reto mas que el de lograr que la peana aguantara el nuevo peso que se le colgaría, es verdad que la peana sería mas grande pero el peso no sería proporcional al aumento de tamaño, si no mas bien mucho mayor (solo el chasis sin partes internas pesa 8Kg). Preví este inconveniente y me plantee dos posibilidades, usar un material mas grueso o unos mini pies que repartiría estratégica mente en la peana para darle la robustez necesaria. La primera opción sería la solución mas fácil, para el proyecto de la Lian-LI había utilizado aluminio de 2mm, tal vez con uno de 3mm para este HDPLEX H5 Ptwo casemod by DeKa fuera suficiente, tal vez 4mm me aseguraría pero ambos grosores implicaban una complicación mayor al momento de plegar este material que quería evitar, ademas de su mayor coste por supuesto. HDPLEX H5 Ptwo casemod by DeKaAsí que pensé, si lo puedo hacer en 2mm mejor, mas barato, mas sencillo aun que tal vez, mas arriesgado… pero si salía bien me serviría la experiencia para otro proyecto…

Así que la peana la realicé de aluminio de 2mm, corté la pieza, la plegué y le monté el chasis… no solo se doblaba como un papel, si no que ademas se movía como un flan, había que buscar la forma de darle un nervio de refuerzo vertical y unos puntos de apoyo para que ésta, consiguiera estar erguida y estable.

HDPLEX H5 Ptwo casemod by DeKa HDPLEX H5 Ptwo casemod by DeKa HDPLEX H5 Ptwo casemod by DeKa HDPLEX H5 Ptwo casemod by DeKa

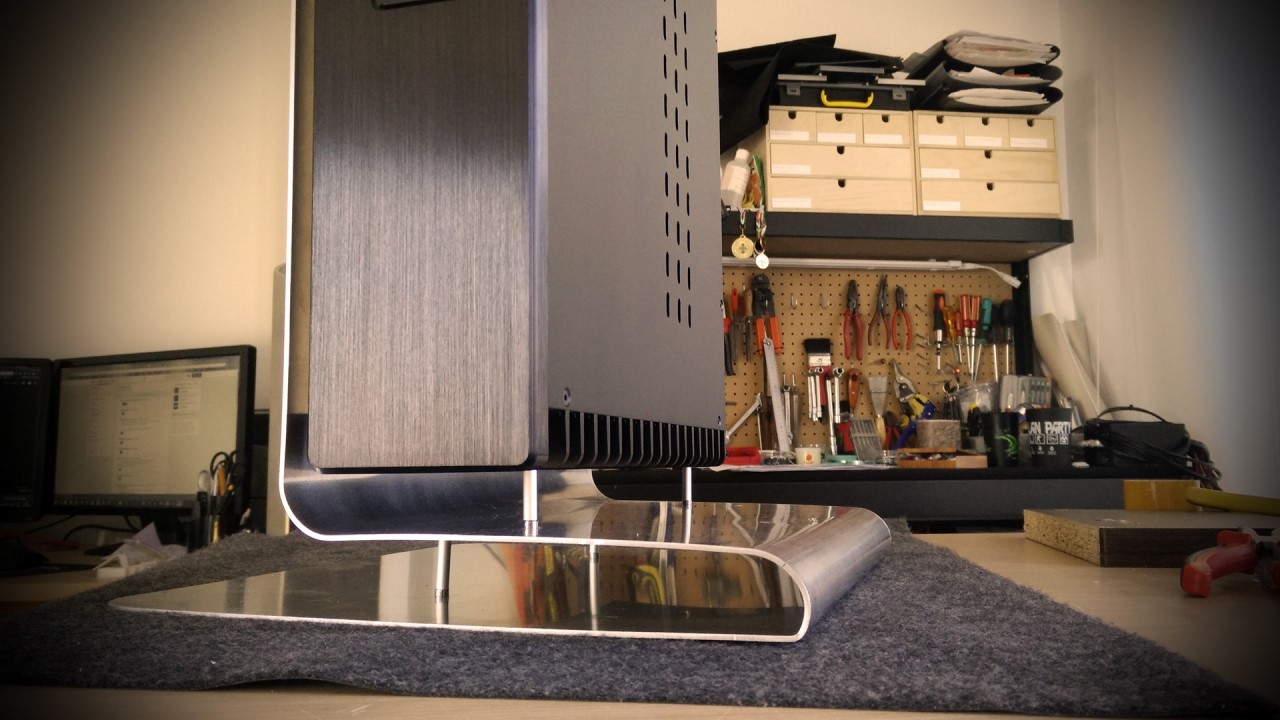
HDPLEX H5 Ptwo casemod by DeKaPara solucionar la vertical, le coloqué dos perfiles en “U” de aluminio anodizado plata en la alzada de la peana del alto del chasis, justo entre el chasis y la peana, y la sujeté con 3 bonitos tornillos avellanados a cada uno. El chasis reposaría en estos perfiles o no, pero la peana ya no se doblaría en alzada. Ademas, al pintar la peana de negro, dejaría los perfiles sin pintar y le darían un toque muy bonito, rompiendo la sobriedad de tanto negro con estilo.

HDPLEX H5 Ptwo casemod by DeKaPara reposar la peana, le coloqué dos piezas cilíndricas de aluminio de iguales características al anterior perfil en “U”, sujetadas por un tornillo y una tuerca previamente redondeada y pintada del color del chasis, para conseguir mejor estética. Algo tan simple como colocar dos piezas para apoyar el ala de la peana y otras dos para apoyar a esta, el chasis fueron suficientes para soportar el elevado peso del chasis y conseguir que mantuviera su forma, estética y equilibrio.

Luego todo era simple, pintar, ensamblar y empaquetar.

HDPLEX Fanless Silent PC Review

HDPLEX 2nd Gen H5 fanless PC case with NAD M51 DAC and Accuphase c-290v Preamp on Audio Rack

A picture is worth a thousand words

HDPLEX 2nd Gen H5 fanless PC case with NAD M51 DAC and Accuphase c-290v Preamp

HDPLEX Fanless Silent PC Review

Silent Gaming PC with Passively cooled GTX 970 in HDPLEX 2nd H5 Fanless PC case ,Temp under 70C under Four hours 3D Testing

Thanks to Jerpelea. The details for this fantastic project could be found at Hackaday
Author also detail his build up log at Silent PC Review Forum SPCR here.

Hardware
CPU Intel i3-6300 (51W)
MB Gigabyte GA-Z170N-WIFI (15W)
RAM Corsair Vengeance LPX DDR4 2133MHz 16GB (2W)
SSD Samsung 950 EVO 250Gb (4W)

Test build
GPU ASUS GeForce GTX 960 STRIX-GTX960-DC2OC-2GD5 (120W) – test built
PSU Silverstone SX500-LG 500W Gold SFX-L (for tuning only)

Final build
GPU ASUS GeForce GTX 970 4GB STRIX-GTX970-DC2OC-4GD5(150W) – final build
Streacom ST-ZF240 ZeroFlex 240W Passive PSU(final build)

RIP
PSU HDPLEX 160W AC-DC w/PFC + HDPLEX 160W DC-ATX (did not start and i returned it to amazon!)

the complete build it takes around 1h and you will obtain an silent computer in an case with with amazing cooling capability
i have tested it in both prime95 and Furmark (burn) and case is able to handle 90W GPU and 35W CPU without any problem

Passive cooled GTX960 in HDPLEX 2nd Gen H5 fanless PC case

Passive cooled GTX960 in HDPLEX 2nd Gen H5 fanless PC case

Passive cooled GTX960 in HDPLEX 2nd Gen H5 fanless PC case

Passive cooled GTX960 in HDPLEX 2nd Gen H5 fanless PC case

Passive cooled GTX960 in HDPLEX 2nd Gen H5 fanless PC case

This project shows how to build a silent gaming machine that would be passively cooled and offer enough power to play latest games with high quality settings.

The GPU is alwais the main limiter in HTPC computers because of the high power usage, HEAT and size limits. The whole idea started after i have checked the power settings of GTX970M GPU that is installed inside high end laptops. This high end GPU has a power limit of 85W while the desktop GTX970 has 150W power limits (officially). In this project i have limited the power to 105W for the GPU and used the GTX970M clocks so that it will fit the cooling capabilities of the case.

The intel CPU has been under powered from 51W to 35W since we dont use the IGP and we need to save some power.

Finally gtx970 is in place.PSU is in final position with thermal pads and cables are reworked

Passive cooled GTX970 in HDPLEX 2nd Gen H5 fanless PC case

GTX970 bios tables Hack to low power
i have replicated GTX970M frequencies and lowered TDP to 105W

Passive cooled GTX970 bios hack to lower power

Passive cooled GTX970 bios hack to lower power

Passive cooled GTX970 bios hack to lower power

3dMark test using the new power and freq table

Temperature does not exceed 70C after 4hours of 3D demo loop

Passive cooled GTX970 3D Testing

Passive cooled GTX970 in HDPLEX 2nd Gen H5 fanless PC case

HDPLEX Fanless Silent PC Review

HDPLEX 2nd H5 Fanless PC case with Passively cooled GTX950 Video Card Intel i7 3700T

Original Review from Hardware.FR Forum

Bonjour à tous,

Je voudrais vous faire un retour suite à l’achat d’un HDPlex H5.
Tout d’abord, j’avais déjà un autre boitier, un Streacom FC8 Evo avec une CM Asus P8H77-I et un Intel i7 3770T à l’intérieur. Cela fonctionnait très bien même si un peu chaud quand même en été…
Pour info, j’utilise ce PC pour faire HTPC, avec un peu de MadVR.

Petite folie : achat du HDPlex H5 avec option carte graphique pour pouvoir y insérer une petite GTX 950.

Commandé sur un grand site de vente en ligne. Arrivé en 2/3 jours. Très rapide.
Déballage sans problème, à part la protection plastique des heatsinks en cuivre qui n’ont pas tenu (trop lourd).
Dans le carton, tout y est : vis, outils, câbles… d’ailleurs, on n’utilise pas tout, il m’en reste une bonne partie même après le montage.

HDPLEX H5 Fanless PC with GTX950 and Intel i7 3770T

J’ai été un peu téméraire car la carte mère Asus que j’avais n’était pas listée comme étant compatible. Bon, je peux dire qu’elle l’est. 🙂
Ouf, je n’avais pas forcément envie de changer de CM juste pour ça…

Montage pas très compliqué expliqué pas à pas, mais ça prend pas mal de temps (enfin, j’ai pris mon temps aussi). Pas mal de petites vis un peu partout et de plusieurs types. Faut pas trop se mélanger les pinceaux.
En tout cas, une impression persiste : c’est du lourd et c’est du solide ! Pas le boitier alu tout moisi… Bon, le prix y est aussi pour quelque chose. On paie en partie au poids 😉
Les heatpipes sont pas trop compliqués à mettre, ça s’emboite pas trop mal, il a juste fallu serrer un peu les petites plaques pour que les heatpipes soient bien dans les rainures.
Détail : il est noté qu’il n’est pas nécessaire de mettre de la pâte thermique entre le proc et le heatsink. Je conseille plutôt d’en mettre très légèrement, ça conduit toujours mieux avec.

HDPLEX H5 Fanless PC with GTX950 and Intel i7 3770T

Ensuite, démontage/montage du radiateur sur la carte graphique, une Zotac GTX 950. Disons que là, ça passe tout juste, tout juste. J’ai un peu galéré en fait et on voit que le heatsink “pousse” un peu un composant (cf photo)… Bon, ça passe quand même, mais tout juste.

HDPLEX H5 Fanless PC with GTX950 and Intel i7 3770T

Ensuite, montage de la carte graphique. Pas de souci particulier quand on a déjà fait le processeur.

HDPLEX H5 Fanless PC with GTX950 and Intel i7 3770T

Montage du reste. J’ai opté pour une alimentation Corsair SF450. Oui, cela peut paraître hérétique pour du Fanless, mais même avec un OCCT, le ventilateur de l’alimentation ne tourne pas… En tout cas, je ne l’ai pas encore vu/entendu tourner. En fait, ce choix s’est fait car je ne voulais plus d’une “brique” d’alimentation externe, j’ai déjà trop de fils à gérer derrière la TV 🙂

HDPLEX H5 Fanless PC with GTX950 and Intel i7 3770T

Dernier assemblage, avec cependant le câble USB 3.0 qui est un peu court avec ma carte mère. Le port USB 3.0 est tout à l’opposé ! Tant pis, je m’en passerai.
Je dois encore régler la luminosité du bouton avant mais le câble d’alimentation des diodes est aussi un peu court (idem, tous les ports USB sont à l’opposé) donc je ne peux pas ouvrir la face avant… de toute façon, je n’ai pas de lecteur dedans, donc on s’en fiche, hein.

HDPLEX H5 Fanless PC with GTX950 and Intel i7 3770T

Pour les tests, je n’ai pas énormément stressé le matériel, mais en utilisation courante dans un meuble ouvert, mais pas hyper bien ventilé, le proc tourne autour de 40/45 en idle et la CG à 33. Ca fait un peu beaucoup pour le proc, mais je vais essayer d’améliorer cela. J’avais testé boitier ouvert avec OCCT, c’était monté vers 74 mais dans une pièce qui était autour de 24/25.
En utilisation courante, ça peut être assez chaud côté CG (MadVR oblige) et pas très chaud côté CPU mais moins qu’avec le Streacom qui ne refroidissait le tout qu’avec un seul côté d’ailettes.

Voilà, c’était un petit retour pour ceux qui lorgnent dessus.
Je vous lis depuis un certain temps quand même et les discussions, produits sont intéressants.

Vive le Fanless (ou presque dans mon cas, *shame*) 😀

HDPLEX Fanless Silent PC Review HTPC Hardware

HDPLEX Silicon PCIE 16 PCIE 3.0 Riser Card Review

Original review from Small Form Factor Forum

Received the HDPLEX Silicon riser (click “Package contents” for more pictures) today and boy what a great riser that is.
This might be the one I’ve been looking for all this time.

Short facts:
Costs about 1/3rd of the 3M riser, about the same as the LiHeat
Is thinner than any other riser in existence
Absolutely solid, can be folded and kinked with no performance impact
No retention clips but higher friction force

The riser just looks gorgeous. It’s also extremely thin as you’ll see in later pictures. You’ll immediately notice that there are no retention clips on the connectors. Their friction force seems to be much higher than that of regular PCIe connectors, I wouldn’t worry about them coming lose at all.

HDPLEX Silicon PCIE16 PCIE 3.0 Riser Card Review

Not necessarily a problem, but certainly a weird solution. The riser has female ports on both ends and uses a small adapter plate to plug into the mainboard. What makes this even weirder is that you can’t plug it in backwards. I tried it, but the GPUs fans were running on full tilt and I got no picture on the screen, so I pulled the plug. Luckily nothing got damaged.

HDPLEX Silicon PCIE16 PCIE 3.0 Riser Card Review

On the bright side (HA!), the riser is actually somewhat transparent so you can see light shine through.

HDPLEX Silicon PCIE16 PCIE 3.0 Riser Card Review

Let’s try it anyway. Here you can see the riser being mounted in Freilite Alpha.

HDPLEX Silicon PCIE16 PCIE 3.0 Riser Card Review

Despite looking so damaged, the riser actually works with no problems whatsoever. I had to reboot once because GPU-Z showed the GPU to run @ x16 1.1 instead of 3.0 as you can see here.

HDPLEX Silicon PCIE16 PCIE 3.0 Riser Card Review

Here you can see how thin and flexible it is. Exact thickness measured with a dial caliper is 0.14mm.

HDPLEX Silicon PCIE16 PCIE 3.0 Riser Card Review

Did I say flexible? I folded the riser five times, sharpening the edges with a ruler. The bend radius is close to zero at this point.
The two folds directly at the connectors were the most interesting, I left about 2mm to the PCB the FPC is bonded to.

HDPLEX Silicon PCIE16 PCIE 3.0 Riser Card Review

Bird it is. Here you can actually see how the riser still folds up in front of the edge of the mainboard. Even if you placed something right against it, there would be about 1-2mm of clearance to the riser itself.

HDPLEX Silicon PCIE16 PCIE 3.0 Riser Card Review

These are the results of running Unigine Heaven 4.0 five times without a riser. We’ll go from here.

HDPLEX Silicon PCIE16 PCIE 3.0 Riser Card Review

Score without the riser being folded. The results are fluctuant and we’ve lost about 100 points. I’d call that tolerable, but this was done without cleanly rebooting before it.

HDPLEX Silicon PCIE16 PCIE 3.0 Riser Card Review

Apparently it works better when folded. This could be due to all sorts of things, but the bottom line is that the riser doesn’t care about being folded at all.
Only 50 points lost on the riser-less benchmarks.
I am left extremely impressed with this robust piece of hardware.

HDPLEX Silicon PCIE16 PCIE 3.0 Riser Card Review